


Tricked-Out Halloween Treat Bag!
What’s better than a giant pillowcase to fill with candy on Halloween? A giant pillow case custom decorated with Halloween art! We’ll use a variety of art supplies including glow-in-the-dark paint to magically transform a pillowcase into a tricked-out treat bag using a modified batik process. This trick-or-treat bag will be “sweet” even without the candy to fill it and makes a great keepsake that can be used for years to come.

ART KIDBIT: WHAT IS BATIK?
Batik is a method of producing colored designs on textiles originally used in Java. Before dying, wax is applied to the parts of the fabric that are to remain undyed.
With these easy step-by-step directions, you and your child will create a tricked out Halloween treat bag using a simplified Batik method. It’s a craft project and art lesson all in one!
Supplies:
- Apron (If Available)
- Grubby Clothes Are a Must!
- Newspaper to Cover Your Work Area
- Drop Cloth for the Floor (If Available)
- White Pillowcase
- 18x24 Piece of Tagboard
- Pencils
- Black Sharpie Marker
- 1 Container of School Glue
- Plastic Gloves
- Fabric Dye (Dark Colors Work Best)
- Dye Mixing Container
- Spray Bottle
- An Additional Piece of Tagboard or Cardboard
- Black 3D/Puff Fabric Paint
- Brightly Colored 3D/Puff Fabric Paint (Any Colors)
- Glow-in-the-Dark 3D/Puff Fabric Paint
Directions
- Begin by covering your work area with newspaper. A drop cloth on the floor is a good idea too. This is going to get messy!
- Next, have your child look at pictures of spider webs. Google Images is a great place to find lots of pictures of creepy, crawly, spooky Halloween spider webs. Talk with your child about the shapes and patterns they see in the pictures.
- Using the images as inspiration, have your child draw a spider web on the tag board with a pencil. When drawing their web, instruct your child not to draw the web lines too close together (close lines will make things difficult later) and to make their drawing very large, so it covers the entire piece of tagboard. Not a spider fan? Jack-o-lanterns and cats make great trick-or-treat bag art too!
- Next, have your child trace over the pencil lines on their drawing with a black Sharpie.
- Put the completed tagboard inside the pillowcase. Make sure to center it in the case. The dark sharpie lines of the drawing should be visible through the pillowcase.
- Next, trace the lines of the web with school glue on top of the pillowcase. Your child will want to move the glue very slowly so that it comes out as a line, not little dots.
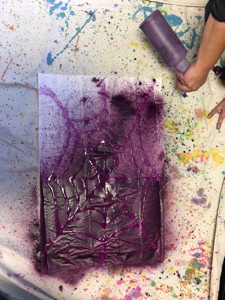
- Now, we get to the VERY MESSY part! Have your child put on plastic gloves. Follow the directions on your dye packaging to mix your dye. Then, pour it into a spray bottle.
-
Now, spray the pillowcase with fabric dye. Keep spraying until the entire pillowcase is covered. Move the sprayer around when spraying so that dye doesn’t puddle in one spot on the pillowcase.
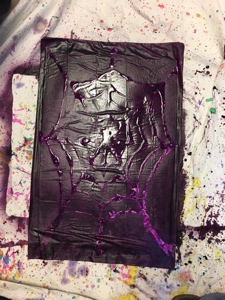
- When finished, lay the pillowcase flat to dry.
- When the pillowcase is dry, it’s time to remove the tagboard from the inside of the pillowcase. The tagboard will be stuck to the inside of the pillowcase. Just peel it off as best you can. Don’t worry about getting every little piece of board off, any remaining tag board pieces will come off in the washer.
- It’s time for the wash! Wash the pillowcase separately in cold water. Then, tumble dry separately. Repeat the wash and dry steps a second time to make sure all the extra dye has been removed. When you are done with the washing, you may have to wipe left over paper pulp from the inside of your washer.
-
Now it’s time to add the finishing touches! Add a spider to your web, some stripes to your cat- whatever your child’s imagination can dream up! If your child chooses to add a spider, have them think about the shapes they see in a spider before they start to draw (i.e.- big oval for the body, small oval for the head, curved lines for the legs). Slide a piece of tagboard or cardboard into the pillowcase under your drawing area to prevent the puff paint from bleeding through. Then, get out your black puff paint and get to work. When the spider is finished, your child may want to add a brightly colored outline around their spider with a second color of puff paint to make it stand out more.
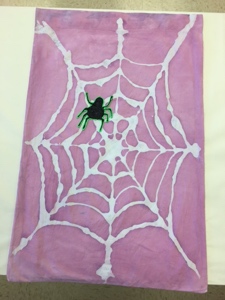
- Lastly, add glow-in-the-dark puff paint wherever you like! Accent the web lines with it. Add some glow around your spider. Be creative! The more glow, the better, especially on Halloween night!


WARNING: The fabric dye WILL STAIN hands and clothes!


Kidcreate is an art studio just for kids that offers children's art classes, camps and art-themed birthday parties for children ages 18 months through 12 years. Making a mess is the best at Kidcreate Studio - Bloomfield!
Make A Difference, While Making A Great Living!
Open a Kidcreate Studio - Bloomfield and use the power of art to positively influence the lives of children.
Click Here to learn More About Franchise Opportunities with Kidcreate Studio.
Kidcreate Studio Newsletter
Classes, studio news, and special offers.